Friday, July 22, 2011

First Results

The first offspring from my breeding with Fedtschenkoana resulted from putting its pollen on the floribunda Orangeade. I honestly didn't know what to expect from this cross. I hoped the all summer bloom would continue, but plant habit, foliage, scent and bloom color were all totally unknown.


There are two seedlings from this cross. I've combined both under the name "Oadefed" on Help Me Find. The first seedling to flower was what I call Repeat Oadefed. It began flowering the summer following germination and continued all summer. It flowers on new growth. The plant shows first generation hybrid vigor, being an even more aggressive spreader (via suckers) than Fedtschenkoana. It is a taller plant which branches, while the species seldom branches unless forced to by cutting or damaging the canes. Its flowers are all carried at the ends of canes and side branches in small clusters.


The blooms are double and open to reveal the stamen. Its petals are papery and soft, beginning a blush pink and whitening to a similar, brilliant white. They arrive in small clusters usually at the ends of the canes and any side branches. They continue the same "Linseed Oil" scent and the plant retains its scented new growth, only it has morphed into more of a cedar scent. Foliage color is different from the species, being more of a yellow-gray-green and turns yellow-gold in fall before being shed for the winter.


Repeat Oadefed will set seed, usually one or two per hip, and the hips remain the same shape and size of the species.


Once flowering Oadefed feels related to the Repeat seedling, but different in a number of ways. Instead of suckering far and wide, it's a much tighter plant, creating a much denser colony of canes. Initially, it flowered on the tops of the canes, at the leaf axis, and resembled a Hollyhock the first two years it flowered. These flowers are more double than the Repeat seedling appears and open quite a bit more formal in shape. Its buds are a deeper pink than the other seedling and remain pink when open, though it also fades from the original color.

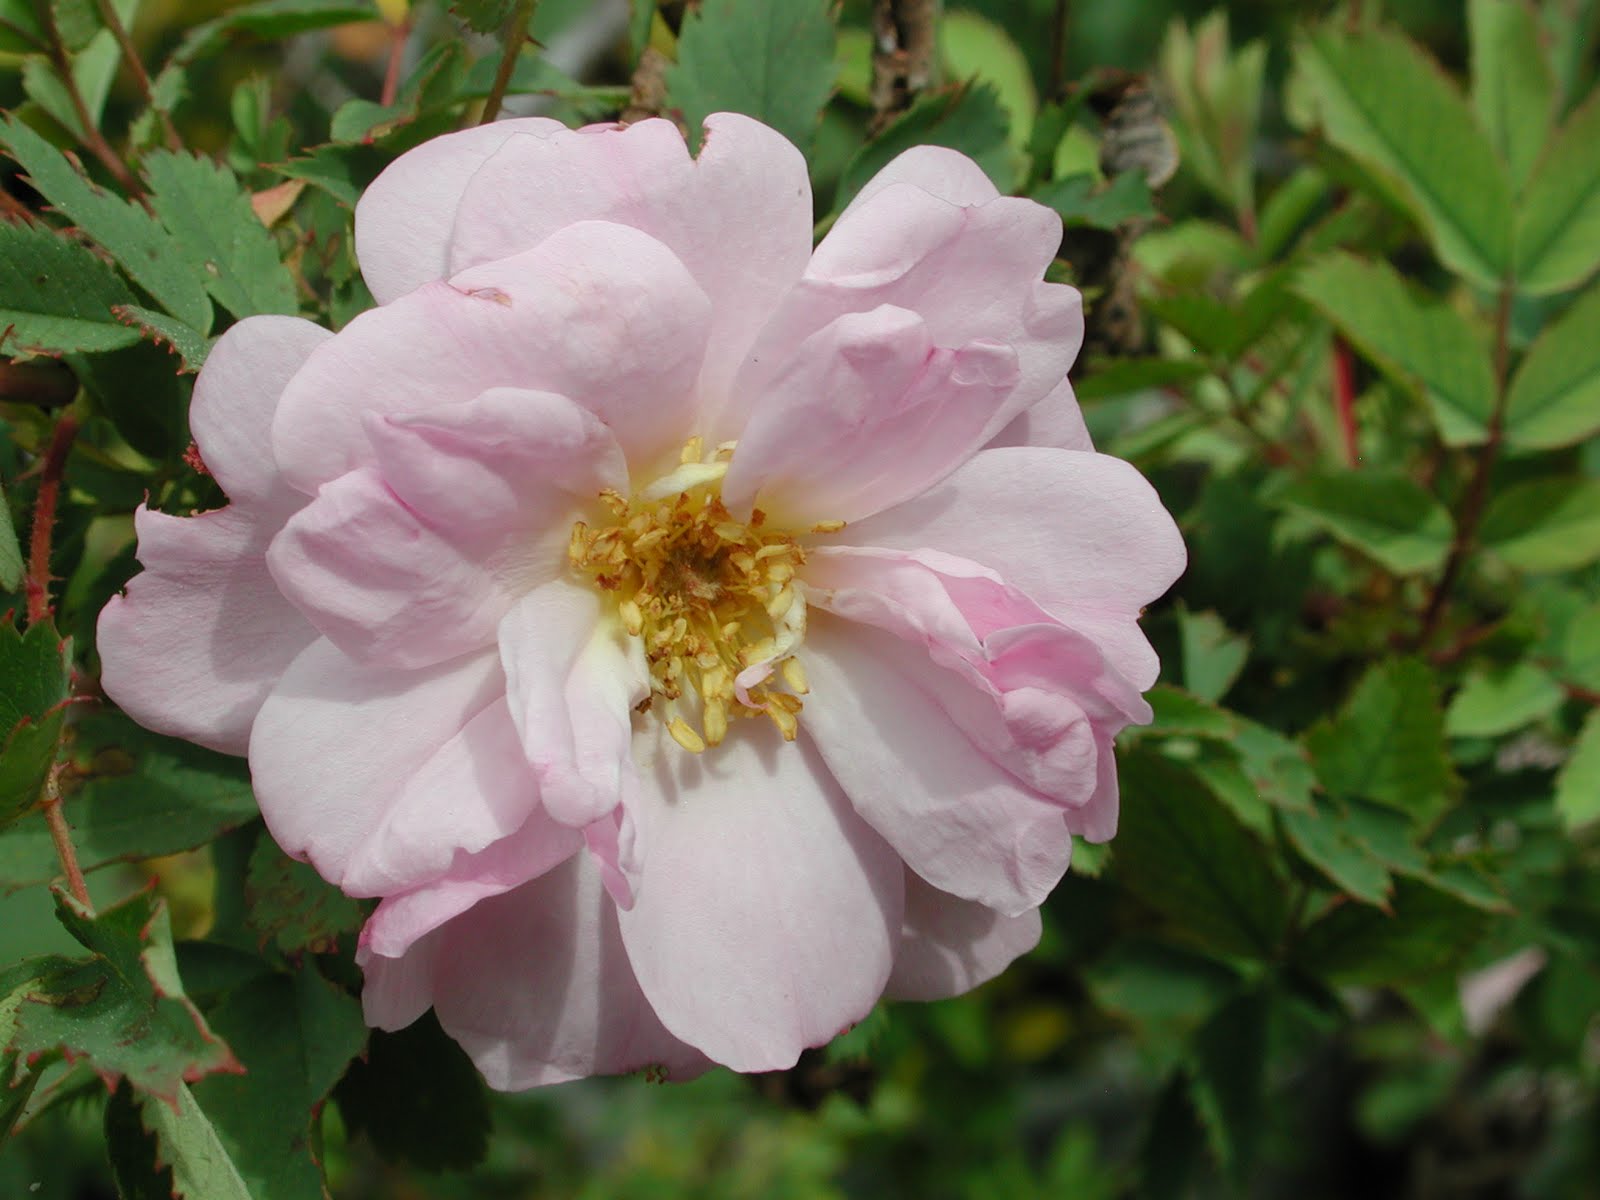


Its foliage is a bit more blue-green than the other seedling and has a shorter autumn color period than the repeater before its leaves brown and fall. This is the seedling Paul Barden has created his amazing purple seedlings from. FedtLav-01, FedtLav-08, FedtLav-09.

Once Flowering Oadefed autumn foliage


Both seedlings are pollen and seed fertile and not quite as particular about accepting other pollen or working on other ovaries as Fedtschenkoana itself is.

Once flowering Oadefed hip.


Orangeade has the characteristic of intensifying all plant pigments, from foliage and wood to flower color. I'd imagined these seedlings flowering with pink petals, but felt surely they would be deeper, more saturated colors than they are. Both retain the "linseed oil" flower scent with papery petals.

I'd begun studying seedlings created with Basye's Legacy, a remarkable species hybrid created by Dr. Robert Basye, formerly of Texas A&M University. The rose had been passed from one enthusiast to the next, often called "Basye's Thornless". Dr. Basye created two thornless seedlings which he spread around. One, he called 65-626,  he wished named "Commander Gillette" after his military commander. The second, 77-361, was bred from Commander Gillette. Both were generally called "Basye's Thornless", creating a great deal of confusion. I'd discovered this rose growing in the Study Plot at The Huntington Library. I'd propagated it and found in their plant card file that this rose was sent to them by Dr. Basye himself and was identified by him as 77-361. Paul Zimmerman, who owned Ashdown Roses at the time, wished to offer it through his catalog to get it wider distribution. We discussed what to call it to differentiate it from the other rose and determined Basye's Legacy was the right name to use for it as it can be extremely useful in creating thornless, black spot resistant roses.

I've grown the 77-361 (Basye's Legacy) from The Huntington, and 65-626 (Commander Gillette) shared by Dr. Basye with a gentleman I met through Garden Web years ago. I've also grown roses spread around as "Basye's Thornless" and all of them are the same rose. There are no differences among them. Which rose it is, no one is going to be able to tell until it is DNA tested. Dr. Basye personally identified the same rose as both 77-361 and 65-626.

I was extremely impressed by its ability to pass along thornless canes, a high degree of disease resistance and extreme fertility. I wanted to see what Basye's Legacy could do combined with Fedtschenkoana's genes, but remembered how obstinate Fedtschenkoana could be as a breeder.

Orangeade had been the best mate for Fedtschenkoana to that point, and I already had a seedling combining it with Legacy, so Dottie Louise was the logical choice for the next step. Dottie Louise was the childhood name for Mrs. Dorothy Crallie, owner and proprietor of the wonderful Pixie Treasures Miniature Rose Nursery, formerly located in Yorba Linda, California. With her daughter, Laurie Chaffin, who is a very talented, creative rose breeder, they produced some beautiful roses and satisfied a loyal clientele for many years. Dorothy loved single roses. This seedling was nearly single and was the first commercial offspring of Dr. Basye's wonderful thornless hybrid. I asked Dorothy's permission to name it for her, but she felt "Dorothy Crallie" wouldn't sell the rose. Laurie suggested her girlhood name, which her school friends still called her, Dottie Louise". Perfect!

Should anyone find the Oadefed seedlings of interest, the time has come to down-size my rose collection. The Once Flowering Oadefed is destined to be removed from the collection. Suckers are available to interested people here in the Continental US for the cost of postage. Please let me know if you'd like some.

Next: The Dottie Louise X R. Fedtschenkoana hybrids.

Thursday, July 21, 2011

Looking for Louis Lens' Pink Mystery

Quite a few years ago, I had the pleasure of sending many rose to Louis Lens, the remarkable Belgian rose breeder. Sharon VanEnoo, a great friend whom I met at The Huntington years ago when we were both volunteers there, traveled to Belgium frequently as her son and his family lived there. She graciously hand carried garbage bags of individually prepared bags of various roses several times over the years she visited. She met Mr. Lens and they became fast friends. Mr. Lens named two roses in her honor, Sharon's Love, and Twins, in honor of her twin grandchildren.

As a "thank you" for the material I sent him, he had Rudy Velle and Ann Velle Boudolf who bought his nursery when he retired from that area of the business, send me a large package of his wonderful roses. Pink Mystery was one of the most exciting.

Mr. Lens was well known for his ground breaking work with species roses. He shared my fascination with the little known American species R. Stellata mirifica, the Sacramento Rose. Of the seven unique hybrids listed on Help Me Find-Roses, six belong to Mr. Lens. Unfortunately, my only photographs of Pink Mystery are unavailable. The closest I can illustrate it is by posting photos of Stellata mifirica and pointing out how it differs; providing the link to the Help Me Find-Roses page for Pink Mystery (the red "Pink Mystery" above); and by linking to photographs in Roseraie environnementale de Chaumont-Gistoux in Belgium.


Pink Mystery's flowers are actually a bit larger with wider petals than Stellata mirifica. The foliage is denser, larger, heavier and a darker green, much more "elegant" as if created from "better cloth", though knowing one will make the other immediately recognizable. Both will flower all summer if given adequate moisture and both have been totally disease free in my old mid desert garden.

Marvelous photos of Pink Mystery growing at the above mentioned garden are Photo of plant; Blooms and foliage; Flower detail. I find it very attractive how the bush in full flower resembles an annual Cosmos.

 Stellata mirifica sets very odd hips, while I never observed any on Pink Mystery.


I grew it for years in my Newhall garden and spread it around as far as I could find people willing to take it on for their gardens. Unfortunately, I lost it and it appears, so have the others who grew it as it isn't shown as being available anywhere in this country. None of the nurseries who had it, still list it. It is conspicuous in its absence on  the Lens Nursery rose list. Requests for any information concerning where it might be found on Help Me Find-Roses and Garden Web have, to date, resulted in no responses.

Hans at  Bierkreek Nursery in The Netherlands, has been searching for Pink Mystery for the past several years, with little luck. Through the generous efforts of a Help Me Find-Roses member who also lives in The Netherlands, Pink Mystery has been located in a public garden, and efforts are under way to obtain propagating material for it. Marvelous news, but difficult for us here in the United States due to the time, quarantine period and costs involved in importing rose material from there to here.

Which brings me to the point of this post. I'm hoping that someone may know of Pink Mystery's existence somewhere here in the United States or Canada. If it can be located in a garden here, cuttings or suckers could be obtained and the plant once again introduced into commerce here without the required paperwork, time and expense of importing it from overseas.

Tuesday, July 19, 2011

Received progress report

First, I owe a lovely lady an apology for being tardy in reporting the success she experienced and so generously allowed me to share here. I'm sorry Mae! Good job and thank you!

About the third week in June, I made the acquaintance of a lovely lady through the Internet and propagating roses. One thing led to another and I sent her a package of cuttings she found interesting and a few I asked her to test for me. Two weeks after sending the package, she emailed me with the following photos showing her success.

Click on the photos, which are credited to their photographer, Mae, for larger images. Click on red names to access other pages with more information about the subject mentioned.

Mutabilis cuttings callused after two weeks of being wrapped, late June to early July.


"Sally's Sister", now referred to as Yellow Sally, callus after two weeks.


LynnPoO, a Lynnie X Pride of Oakland cross which has impressed me very much!


This is a seedling I've called "Carlrunhat" Seedling # 3. It contains a Robert Rippetoe seedling of my Carlin's Rhythm crossed with Home Run, pollinated by Grandmother's Hat, a wonderful found rose that grows and performs beautifully in much of Southern California. Carlin's Rhythm is my cross of Lilac Charm and Basye's Legacy. Through Home Run, this seedling has Knock Out as a grandparent.


Basye's Thornless Wichurana showing how eager it is to root!


Mae's handiwork, waiting for further growth and development. Please, keep us informed how they do for you, Mae, and thank you!


Friday, July 15, 2011

1-72-1Hugonis

(Remember to click on the red links for further information about the subjects. Clicking on the photos opens larger images of them in a new window.)

I obtained a species rose from Ralph Moore a long time ago, which he identified as R. Hugonis. It has many characteristics in common with it, but some have questioned the identity. Until someone can positively identify it as something else, I am content to call it Hugonis.

I'd put its pollen on quite a few roses over the years, often with no results. One year, a seedling germinated from a batch of seed harvested from his wonderful mini breeder, 1-72-1, from pollen from this Hugonis. From the look of it, this one was definitely not a self set seed, but had to be from the species pollen. It is unnamed, other than to document its parentage, 1-72-1Hugonis.

The foliage is larger than the species, but still has much of its appearance. Two other very nice differences between it and the species are the seedling's near total lack of prickles and its greater vigor.

I had the good sense to share cuttings of it with Paul Barden, who was a great steward of it. Unfortunately, I lost the original plant, but Paul propagated it and sent me back a plant. (soap box time)...If you have a rare plant or seedling and wish to make sure you don't lose it permanently, PLEASE share it with those who will keep it going because they value it. Ralph Moore lost a number of roses over the years he lamented losing because he never shared them. This was one good reason he was as generous with his breeding stock in later years.

I've grown the plant Paul sent me in a seven gallon can for several years, finally getting it into the ground this summer. Now, it is doing something I've never witnessed from it. After the spring flush of flowers, the heat wave has brought another flush of bud and bloom! These images were taken yesterday morning, July 14, 2011, weeks after the spring flush of bloom was complete. There are other buds forming on the plant.


I'll be watching this one closely from now on in hopes of it stabilizing and providing reliable repeat flowering. I'm also keeping my fingers crossed as I beat the rodents to the ripe hips this year! Next spring should (hopefully!) see some first generation hybrids of this lovely Hybrid "whatever it is"!

Thursday, July 14, 2011

Rooting flower clusters

In an earlier post, I mentioned how the easiest material so far for me to root using this method have been the actual flower clusters. The terminal shoot pieces which actually held the flowers. I mentioned earlier that I'd always been taught these don't have growth buds and don't make suitable cutting material.

Polyanthas make many of these with few buds per stem, making selecting cutting material from them rather difficult.

Shadow Dancer is Ralph Moore's striped climber bred from his striped line and Dortmund. It has proven to be rather difficult to bring from the callus stage through rooted plant. To date, this has been the most successful cutting of that variety. It is actually the flower cluster which formed at the very end of the cane.


You can make out where the flower cluster was in the above photographs. This should encourage more people to actually try these shoots as they DO contain growth bud and can develop into successful plants!

Saturday, June 25, 2011

Tweaking thinking

After a few more emails and questions, the thought occurred to me that presenting these ideas may make this a bit more logical to readers, so here goes!


Why should wrapping cuttings and maintaining them in the lower temperatures work better?


First, remember the instructions on packaged bare roots about mounding? The idea is keeping the plant cool, dark and damp stimulates the formation of roots instead of top growth. Absence of light and heat combined with dampness is what roots grow in. Adding heat and light stimulate leaf, cane and flower bud growth.


Wrapping the cuttings in damp paper simulates damp earth, as does the darkness. Keeping them cooler prevents formation of the chemicals which trigger top growth, favoring the formation of callus and roots instead. The cuttings already contain the programming to form callus which further develops into roots. Providing them the appropriate conditions to favor that kind of development speeds the process along. Holding them in higher or warmer temperatures stimulates both growth and callus, often the former at the disadvantage of the latter.


The whole reason for the rose to grow is to create flowers. The whole reason for the creation of flowers is to attract pollinators to create seed and perpetuate the species before the plant dies. Pollinators and the plants evolved together. The more successful roses broke into growth and flower as the appropriate pollinators arrived. Both were stimulated into the appropriate state of development simultaneously. Providing different conditions than those outside "trick" the rose into doing what is wanted from it, much like the Romans passing steam under potted roses to force them into flower out of season. Also, much like forcing Paper White Narcissus into flower earlier than usual for the holidays.


If your temperatures are already higher than the suggested sixty to almost seventy degree temperature range which I've found beneficial, why not wrap them, and presuming you have enough room, put them in your vegetable crisper? Prevent them from freezing, of course, but the cooler temperatures in the fridge should also stimulate callusing, though probably at a slower rate. Rose roots continue growing in near freezing soil. Not as quickly as they do in warmer soil, but they do still grow. You might find the need to hold them for three weeks at the lower temps than is optimal at the upper end of the suggested range. Only experimentation will determine that.


I've been repeatedly asked about my potting soil. I have some humidity and more than a little heat. Though no where near as extreme as many other places, it does get HOT here now. The evaporation rates are quite high, yet the evenings remain cooler and even with the heat, it is still humid enough to rot plants sealed under plastic or inside a terrarium. For these reasons, I use moisture control potting soil. If your humidity is greater so evaporation is slower, that man remain too wet for the conditions, rotting the cuttings. Many years ago when propagating for The Huntington Library as a volunteer, using their mist propagator, we used half coarse builders sand and half perlite. It remained damp after the water drained through it, but it also had a lot of air space in the mix so the cuttings didn't rot.


I've known people who tried to replicate the mist propagator and failed because of using organic based soil mix. Continuous wetness causes organics to sour. Dampness works, constant watering, doesn't. The wetter and more humid it is, the more open and fast draining you need your soil mix to be. Same holds for cool temps. Hotter and drier makes for greater evaporation, hence greater water holding capabilities.


It's dramatic the difference humidity makes. My old climate had none (usually) and required keeping everything covered in plastic or they'd die nearly immediately. Here, covering anything in plastic results in it molding nearly immediately. I've never been able to just stick any kind of cutting in a pot in the shade and have it root, but I've done it with hibiscus over winter. I'm going to mess with Mutabilis this winter attempting the same thing. I figured I'd have to put callused rose cuttings under plastic once planted out, but they're forming roots with half day full sun in foam cups. That wouldn't have happened in Santa Clarita. But, then, I never had the fungal issues there I have here, so the humidity is far different. I can FEEL it here, I couldn't there 99% of the time.


The best way is to get a handle on your humidity and how it varies with the year (presuming it does). Surf and absorb all the various methods you find explained and develop one combining the best of all of them, tweaked to your heat and humidity, then begin experimenting with it to see how it has to evolve to work where you are with what you are trying to propagate. 


Once you figure out your humidity and evaporation rate, you can determine what kind of soil is best for you to use. You can also decide whether or not you need to cover the cuttings once callused. I'm finding planting them deeply in the soil to maintain cooler, damper, darker conditions, is working quite well without rotting or drying out before rooting. Think of the cutting in terms of a bare root plant as they really do require the same conditions until they form the root system necessary to support the leafed out plant.

Tuesday, June 21, 2011

Progress and assorted thoughts on wrapping

After some discussions on Garden Web and a few private emails, I thought it might be of interest to share some further thoughts about wrapping and show progress of the China rose cuttings which were planted just ten days ago (June 11).

It's guaranteed this will require tweaking to be as successful as it can be in other areas, as does anything else related to gardening. I'd originally felt thicker cuttings were going to be more successful. That doesn't explain the 18 foam cups of China roses (really thin, twiggy cuttings, some a quarter the gauge of an eyebrow pencil)  pushing roots out the bottoms of their soil balls. It also doesn't explain the thin cutting of Escapade developing nicely into a maturing plant in a pot.


I do tend to try to make thinner cuttings longer than thicker ones and that appears to have helped. The China cuttings are all five to seven inches long. For any new shoots sprouting from them, I just cut them off leaving the side buds alone so there isn't a lot of softer growth. The "joints" and increased growth buds appear to help, like the traditional "heel" always suggested to take with cuttings with.

These images show cuttings in 16 oz. foam cups followed by each one's roots at the bottom of the soil ball. Clicking on the images enlarges them for more detail.


Chinas can be difficult to select wood to cut for propagation. There are so many "joints" with new growth pushing out everywhere. I selected wood I could cut the five to seven inches of growth. Any buds which had pushed leaves or new canes, I simply trimmed off, leaving a few growth buds on the cutting so new growth was possible from that sprout once rooted. Some of the trimmed, newer growth actually callused and formed roots. Buds which had begun to push and form new foliage were also trimmed so there was no leaf tissue to rot in the damp paper.

Genetics definitely play a role as some just don't have the genetic ability to form callus well nor to form roots which will support the plant efficiently. Shadow Dancer has been a difficult one to encourage to callus and root. Gauge of wood doesn't seem to matter, nor does cutting length. What has rooted most easily are the actually flower clusters where you traditionally don't expect to find growth buds.

The level of stored nutrients available in the cutting will probably also help determine success. Any pathogens already on the cutting when wrapped should also play a part. I'm not sure how wide the successful range of moisture there is with the paper, but too wet WILL cause failure as they suffocate, drown, rot. I haven't experienced what I might consider too dry yet.

It appears temperatures higher than the sixties degrees F range to hold the wraps are too high and inhibit callus formation.


As I've collected the cuttings, I have dropped them into a bucket of water to hold them until I was ready for processing and wrapping. Perhaps if they are too dry when wrapped, that might play a role in failure? I collected, cut, stripped foliage, bundled and tied together with twist tie with label strung on the tie, then dropped the bundle into the water where they waited for collection to finish. Then, I'd shake off the water, dunk them into the Dip'n'Grow and wrap. The wrap would then go into a plastic bag, sometimes several together, and into the work room.

I haven't tried any really soft cuttings yet. My impression is they would benefit from mist propagation to prevent them from collapsing or rotting where harder wood, perhaps better described as hard wood cuttings, seem more appropriate for the method.

Traditionally, you'd use a flowering stem from a recently shattered flower for propagation. I have used that with the wraps and they have worked. I've also used wood older, more mature than that and that has worked. I haven't used anything newer or softer than that with it. They have just 'felt' too immature.

If it's difficult to squeeze out enough water from the paper, try an old rolling pin you wouldn't mind getting printing ink on. That might  provide a make-shift wringer for your paper. You should be able to squeeze out even more water than possible by hand, and it should be a lot easier on your (MY) hands!