I wrapped my first cuttings Christmas Eve, with a second batch on New Years Day. All very good takes. I'm on the fifth batch now, having wrapped cuttings from a friend who potentially discovered a "lost" polyantha in her town.
After some discussions and questions on Garden Web about a few points, I decided I should add a few photos to illustrate.
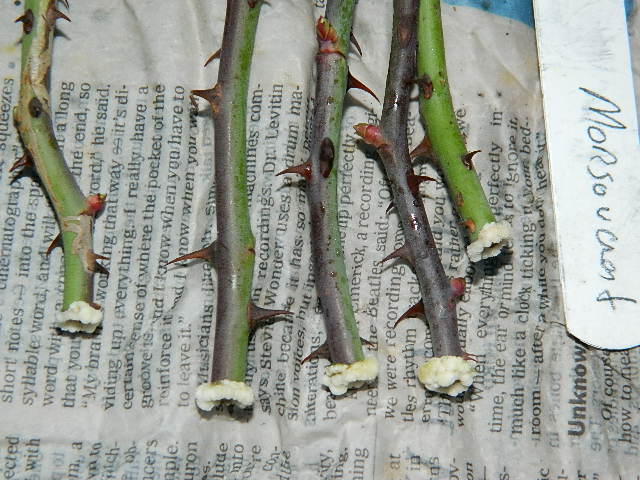
No, you don't have to wait until there are actual roots to pot up the cuttings. Callus at this stage of development can work just fine.


Some find covering their cuttings with bottles, bags or placing them in a greenhouse or terrarium helps prevent them from drying out until they are rooted. If that works well in your conditions, great, but it hasn't worked for me here, at all. So, I plant them deeply in the cups, like this.


Most of the cutting is now encased in damp, cool, dark potting soil, much like when you mound or hill up a newly planted bare root. It works for both for the same reasons. Warmth and light stimulate growth buds to develop, resulting in new leaves and canes, often to the point of flowering, whether there are sufficient roots to support the plant or not.
Encasing the cutting or newly planted bare root in soil, only permitting the top few inches to be exposed to the heat, dry and light, keeps the cutting or plant cool, darker and damper which stimulates root growth instead of cane, leaf and flower. This has successfully permitted several hundred wrapped cuttings to continue rooting and developing for me this and last year.
As I see roots filling the bottom inch or so of soil, and top growth being produced, they finally reach the stage where I'm comfortable lifting them in their pots so more cane is exposed and more soil area provided for more root development. It's an easy shift to make.
I tilt the soil ball out of the cup, add enough soil to the cup to elevate the cutting so it will be situated in the cup at what should be the proper planting height, then set the bottom of the soil ball back in the cup. Gently pull the soil around the cane above the root area away from the cane as you push it into the cup to fill in around the roots and soil. You're really just trading spaces it occupied from above the roots along the cutting, to below the roots where it permits more root growth room.
Until now, that extra soil kept the cutting dark, cool and damp while it rooted. Now it can be exposed to the hotter, drier, brighter conditions without having to harden it off as would be required had the cutting been covered by plastic or bottles, or grown in a greenhouse or terrarium.
I took to heart your advice on rooting blooming stems. I never really thought about the lack of adventitious buds on rose branches until I tried to get some growth off the canes forming standard roses... Long story there.
ReplyDeleteHowever, your suggestion that formerly blooming stems can send out growing canes convinced me to give rooting these a try.
This past Christmas, I bought some branches of rose hips from the grocery store. The branches are used in holiday floral arrangements, great hips on long 16" stems forming big sprays of a couple dozen hips each. After I harvested the hips, I scraped and dipped the stripped stems and stuck them a plastic grower's pot filled with damp potting soil. That got put into a white plastic trash bag and left on my deck in shade. I'm in San Francisco and winter here isn't too cold.
I now have a bundle of a dozen mystery roses. ALL of them took and all of them are leafing out. Hmmmmm...
Wish I could post an image here.
Now comes the detective work of identifying these unmarked roses.
Fun to learn new things, isn't it? It's also amazing how easily some of these things will root! Were the hips small and round like a multiflora? Often, they've been used for decoration. You might take a look at Help Me Find for multiflora to see if that's it. Good luck!
ReplyDeleteWhile I was on HMF, I checked out a bunch of species rose images. The two closest matches, color, hip size, color and shape and stem color seem to be Rosa virginiana or Rosa caroliniana (not counting the myriad synonyms). I might have an ID.
ReplyDeleteGreat to see the method working well for you, Kim :)
ReplyDeleteAnother reason to pot the calloused cuttings up before they form roots is that the newly formed roots are extremely fragile and moving them often results in breakages. The professional growers here propagte their understocks in the same way. They wait until the callous has formed to this stage because it allows them to bundle them all together without fear of breaking off any roots, carry them out into the field, and push them into the freshly tilled ground quickly and easily without setting them back. The callous material is quite hard and resilient.
Further research is now needed to address a problem that I encounter a lot using this method. The cuttings can appear to be going very well with nice fat callouses and swelling buds and then suddenly they will shrivel up and die as though they are suffering from dehyradtion despite being in nice moist potting mix. They go into decline almost overnight and I have never been able to reverse it. My guess is that there must be quite a small window of opportunity for these cuttings to succeed and if a callous doesn't form roots quickly enough once potted up it is unable to take up enough water as the undifferentiated callous material is ineffective at initiating transpriation.
It doesn't happen with all cuttings. Anything wichurana-based literally hits the ground running and grow like stink on a skunk. I find it happens regularly with China/Tea/Noisette/Bourbon and some HT type cuttings. I potted up about 16 cuttings of 'Elina', all of which had calloused quickly, and only one made it past this point. 'Rugelda' also did this. I'm not sure how to get around this yet??? Maybe soaking the calloused ends in a rooting gel or willow tea (or both) to try and promote root development more quickly and strongly might work???
I think I will have a chat to David Zlesak to see if he can shed any light on this conundrum.