Tuesday, March 27, 2012

Keeping my fingers crossed!

It's been two weeks since receiving and wrapping the cuttings of Schmidt's Smooth Yellow, the thornless, yellow poly Jackie Schmidt rescued from an old cottage in her coastal California town. 

I was excited to find they had callused and actually begun to form roots on one cutting! These have been potted deeply in new soil and placed with the other cuttings out front where they will receive part day, morning sun. Hopefully, getting this remarkable rose growing in more gardens will not only insure its survival, but assist in determining what its original name might be. Yes, I'm keeping my fingers crossed! 


Thursday, March 22, 2012

Surprising March Discovery

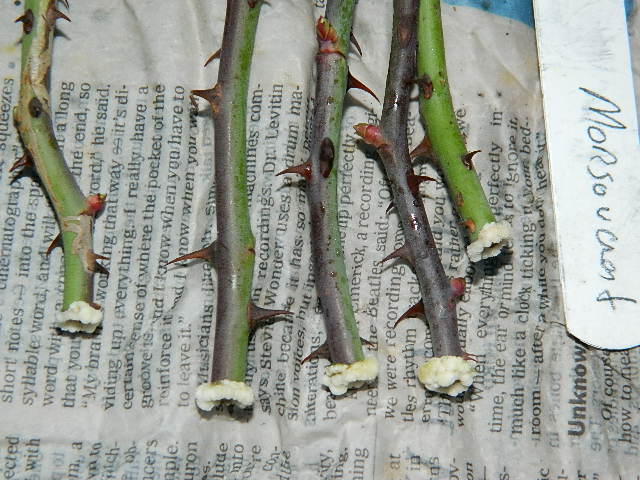
I'd been asked to root two roses for a friend, to ship to him later this spring. Today was their two week period, so I unwrapped them to check on their progress. 

Both are hybrids of R. Wichurana, a rose which is well known for being quite easy to root. The first is a seedling of my own which is half floribunda and half the second rose. It callused as expected and the cuttings were potted. 

Then, the surprise! 0-47-19 is Ralph Moore's breeder created from R. Wichurana crossed with the floribunda, Floradora. I knew it would root, but I wasn't really expecting to find this....


Friday, March 9, 2012

2012 Wrapping Update...


I wrapped my first cuttings Christmas Eve, with a second batch on New Years Day. All very good takes. I'm on the fifth batch now, having wrapped cuttings from a friend who potentially discovered a "lost" polyantha in her town. 


After some discussions and questions on Garden Web about a few points, I decided I should add a few photos to illustrate. 


No, you don't have to wait until there are actual roots to pot up the cuttings. Callus at this stage of development can work just fine. 


 Yes, you can wait until there are actual roots, but it seems the longer you permit them to sit in the dark, damp paper, the less likely they are to succeed. Until they are exposed to light so the green parts can photosynthesize their own food, they are operating on whatever levels of stored nutrients they contain. Permit them to use up their stores of food and they have nothing (or not enough) left to help carry them until they can push out roots to take up more resources.

Some find covering their cuttings with bottles, bags or placing them in a greenhouse or terrarium helps prevent them from drying out until they are rooted. If that works well in your conditions, great, but it hasn't worked for me here, at all. So, I plant them deeply in the cups, like this.


Most of the cutting is now encased in damp, cool, dark potting soil, much like when you mound or hill up a newly planted bare root. It works for both for the same reasons. Warmth and light stimulate growth buds to develop, resulting in new leaves and canes, often to the point of flowering, whether there are sufficient roots to support the plant or not. 

Encasing the cutting or newly planted bare root in soil, only permitting the top few inches to be exposed to the heat, dry and light, keeps the cutting or plant cool, darker and damper which stimulates root growth instead of cane, leaf and flower. This has successfully permitted several hundred wrapped cuttings to continue rooting and developing for me this and last year. 

As I see roots filling the bottom inch or so of soil, and top growth being produced, they finally reach the stage where I'm comfortable lifting them in their pots so more cane is exposed and more soil area provided for more root development. It's an easy shift to make. 

I tilt the soil ball out of the cup, add enough soil to the cup to elevate the cutting so it will be situated in the cup at what should be the proper planting height, then set the bottom of the soil ball back in the cup. Gently pull the soil around the cane above the root area away from the cane as you push it into the cup to fill in around the roots and soil. You're really just trading spaces it occupied from above the roots along the cutting, to below the roots where it permits more root growth room. 

Until now, that extra soil kept the cutting dark, cool and damp while it rooted. Now it can be exposed to the hotter, drier, brighter conditions without having to harden it off as would be required had the cutting been covered by plastic or bottles, or grown in a greenhouse or terrarium.

Monday, January 2, 2012

Solanum pyracanthum

Last year, I posted for help identifying a real "Tim Burton" like weed which was identified as Buffalo Burr. This one is a deliberate addition because I just like it. Nothing seems to eat it...yet, though I know being a Solanum, it's likely quite toxic. But, the spines are beautiful, even if they eminiate from every plant surface. They glow in the direct sun much like the prickles on R. Omeiensis pteracantha. Like that rose, it does feel very prehistoric. I find it rather sculptural and very interesting. Besides, with a common name of "Devil's Tomato", how could I resist?

I've been told to watch it as it can help itself to the entire hill, though in over a year, only one seedling has volunteered. Even when I harvested the small, green "tomatoes" it forms from each flower and deliberately planted the seed, only one germinated and has gone to 'grace' a friend's garden. The seedling has grown to an amazing size, probably due to his fertile potting soil and partial shade he's provided, but here in this 'dirt' and in harsher conditions, both are remaining under two feet...so far...


It belongs here, it DOES have "thorns".

Sunday, December 11, 2011

Flower cluster propagation update

In an earlier entry, I showed how I'd rooted a flower cluster, the type of growth quite often disparaged for propagation as it supposedly doesn't contain growth buds. This is what that bloom cluster of Shadow Dancer looked like today, not quite a year since it rooted, when I planted it in the yard. 

The actual flowering part is to the right, the new cane, in all its thorny glory, is the one on the left. 
 That's a two gallon nursery can it's planted in.
 Not bad growth from a less than a year old rooted plant, particularly from growth most often dismissed as unsuitable for propagation.

The "terrace" down hill is for seedlings and the ever-present alyssum. The stuff grows like fire, but nothing eats it and it keeps the other weeds down. The wire basket is to inhibit the mole I haven't yet been able to send to his reward.


Saturday, October 29, 2011

Wrapping refresher...

Now the weather is finally cooling, many of us can begin experimenting with wrapping cuttings. There are a few questions which have been presented to me, so I'll attempt to answer them here, with all I've discovered here in my climate.

1. The best wood is that which has over wintered, hardened off and stored enough nutrition to break dormancy in spring. Wrapping cuttings which are fresh flowering stems hasn't been successful in many cases based upon those who have written me and in my own attempts. The wood has to contain enough stored food to permit it to callus, form roots and begin life as an independent plant. Stems grown this year, whether it has flowered or not, have, in most experiences reported to me as well as my own, proved too soft and failed. Wood grown last year and carried over winter is the best for this method.

2.  It appears the most beneficial temperature range to hold the wrapped cuttings under is between the low fifties to mid to upper sixties degrees F. Too high and they won't callus, and may either dry out quickly or even rot. Too low and they preserve like produce in your vegetable crisper, without callusing.

3.  From experiences reported to me and my own, it appears if the cuttings aren't going to callus within the initial two weeks of being wrapped, leaving them longer reduces the probability they are going to callus at all. Of course, you may experiment, leaving them as long as you wish, but from reports and observations, two weeks is the optimum time, at the optimum temperatures.

4.  You MUST remove all the foliage from all of the cuttings, PERIOD. Leaves wrapped in the damp paper can both cause the cuttings to dry out as well as rot. You are dealing with hard wood cuttings. These are best dealt with bare, no foliage left on them.

5.  You may remove the prickles if you wish. You don't have to remove the prickles if you don't want to. Removing them, if possible, can expose more cambium layer, which can then callus and eventually form roots. Removing them, if possible, can also make handling the cuttings nicer and prevent the damp paper from being damaged and hanging on to the cuttings when removing them from the wraps. This part is completely up to you.

6.  You do not have to treat the entire cutting with rooting hormone. You treat the bottom end, the end you expect to form roots. Other exposed sections of cambium can form callus and roots along the cutting. You may, if you wish, cut the cutting up to make use of the places it is forming roots, or, you may simply plant it as deeply as you wish to form roots anywhere it wants. Again, up to you.

7.  The length of cutting is up to you. I intend to experiment this winter/spring using one and two bud long cuttings to see just how much is necessary for the method to work. I've already demonstrated you can root whips up to nearly four feet long of suitable types for standard trunks. I also want to experiment with my VI Fortuniana to see if precallusing them can make the bloody things root more easily. If you're intending on rooting stocks for budding this summer, this may give you a leg-up getting your material ready.

Sunday, September 25, 2011

Oh, Goodness!

Oh Goodness! A friend emailed me this evening to alert me I am now "famous"? She discovered I am now listed as a "Reference" about the rose Iceberg on Wikipedia! Scroll down to the Reference section and you will find my article, "Poor Old Iceberg", published on Help Me Find-Roses. Is that a hoot, or what?

Wikipedia article about Iceberg